Using OSX? Why Aren't You Using iTerm, ZSH, and Prezto?
Most developers I run into today (as well as most dev shops) are using Macbooks as their development platform of choice. However, I’ve been surprised how many are using defaults. Notably:
- Bash
- Minimal/No Prompt Customization
- Standard OSX terminal
There’s an opportunity to massively improve your terminal experience with a few steps.
Perhaps it’s my experience working on Linux distros as my primary dev workstation for so long, but this tendency to stay with bash and basic terminals is always a surprise to me. Then again, many Ubuntu users stick with the default terminal these days, too.
Here’s what I consider a good set of base steps to make the terminal a better place to spend as much time as most platforms and tools expect these days.
Install iTerm2 #
You can install iTerm2 from their website, or if you have homebrew and cask installed you can install it this way too:
brew cask install iterm2
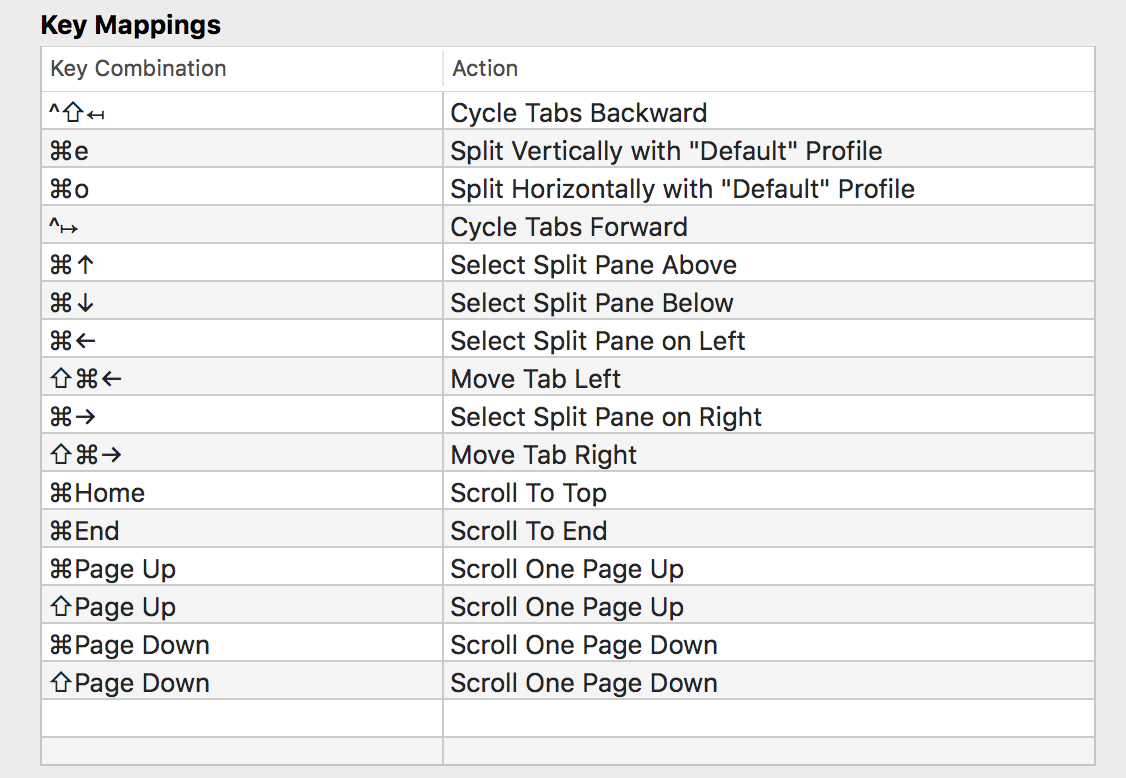
Once installed, the first thing I always do is set up split pane keystrokes:

In particular:
- Cmd-E - Split Pane Vertically
- Cmd-O - Split Pane Horizontally
- Cmd-Right - Move Pane right
- Cmd-Left - Move Pane left
- Cmd-Up - Move Pane Up
- Cmd-Down - Move Pane down
I choose these because they are reminiscent of Terminator on Linux, but you can choose any keystrokes you want.
I also choose a sensible terminal theme for my profile other than “White and gross”. If none of the built-in themes float your boat, you can always download this huge set of themes.
Switch to ZSH #
The rest of this suggestion is about switching to ZSH from BASH. ZSH adds a ton of sophistication while still being wholly compatible with the world of BASH. It also has a vibrant community build around it.
To easily switch OSX you simply need to:
- Go to System Preferences
- Go to Users and Groups
- Unlock via the lock icon
- Right-click (or dual-click) on your user and go to ‘Advanced Options’
- Change your shell from
/bin/bashto/bin/zsh

(Note: Many people also install a more maintained version of ZSH from homebrew - I’ve never needed my zsh to be overly current, but your mileage may vary.)
Once you do this your default and iterm terminals will open new tabs in ZSH instead of BASH. Now you need to care about .zprofile and .zshrc instead of .bash_profile and .bashrc.
Installing Prezto (or Oh My Zsh) #
Now that I have ZSH as my default terminal, I usually install Prezto, which in turn slams in a ton of sensible defaults and awesome prompts you can use to make your prompt super reactive to you.
I recommend viewing the link above for up-to-date install instructions, but for the “of the day” instructions as I write this you only have to clone a github repo into your home dir:
git clone --recursive https://github.com/sorin-ionescu/prezto.git "${ZDOTDIR:-$HOME}/.zprezto"
setopt EXTENDED_GLOB
for rcfile in "${ZDOTDIR:-$HOME}"/.zprezto/runcoms/^README.md(.N); do
  ln -s "$rcfile" "${ZDOTDIR:-$HOME}/.${rcfile:t}"
done
All this does is set up your home directory with the right “dot-files” to make prezto happy, including a .zprofile and .zshrc that will enable several other files keyed off of the .zpreztorc file in your home folder. I’m assuming you don’t already have dot-files for ZSH at this point; if you do save them off before doing this.
Once you run this startup, the place to customize Prezto is the zpreztorc file, and the place to add your own customizations to ZSH is still the .zshrc file, just below all of the Prezto activation steps.
Additional Prezto Modules #
After you install Prezto, you will almost certainly want to add some modules to make it more powerful. Your mileage may vary, but I almost always install:
- archive - Creates
archive,lsarchive, andunarchivefor generically working with a variety of archive types. - autosuggestions - Enables
zsh-autosuggestions - docker - Adds a ton of aliases and functions for working with Docker
- fasd - Creates a hotkey for switching the active directory based on most-recent/most-frequent semantics
- git - Adds a ton of aliases and functions for working with Git.
- homebrew - Adds a ton of aliases and functions for working with Homebrew
- node - Adds a ton of aliases and functions for working with Node
- osx - Adds a few commands for triggering behavior that is OSX specific, like working with the clipboard and interacting with the Finder.
- rsync - Adds a few aliases for the most common rsync actions
- ruby - Adds aliases and functions for common ruby work
- screen - If you use screen on remote systems, this is a series of useful aliases for working with it
- syntax-highlighting - Enables zsh-syntax-highlighting
For all of these, see the individual module READMEs under the Prezto homepage for more details on what they do.
For example, here is what my .zpreztorc file’s module load line looks like (a default list exists which I have customized):
zstyle ':prezto:load' pmodule \
  'archive' \
  'autosuggestions' \
  'docker' \
  'environment' \
  'fasd' \
  'git' \
  'node' \
  'osx' \
  'rsync' \
  'ruby' \
  'screen' \
  'syntax-highlighting' \
  'terminal' \
  'editor' \
  'history' \
  'directory' \
  'spectrum' \
  'utility' \
  'completion' \
  'prompt' \
Prezto prompt #
You can choose a custom prompt theme via the use of the ZPrezto prompt command (notably prompt -l and prompt -p for preview), but I find the default choice (Sorin) to be excellent.
Other Worthwhile Additions #
There are a ton of ZSH shell customizations on the web, but just a couple I regularly use are:
# .. will already work as 'cd ..' in prezto ZSH
# Go up two directories
alias ...='cd ../..'
# Go up three directories
alias ....='cd ../../..'
# Go up four directories
alias .....='cd ../../../..'

# Go up an abritrary number of directories
# Use with 'up' or 'up 5' to go up N directories
function up {
    if [[ "$#" < 1 ]] ; then
        cd ..
    else
        CDSTR=""
        for i in {1..$1} ; do
            CDSTR="../$CDSTR"
        done
        cd $CDSTR
    fi
}

# Colorized CAT!
alias ccat='pygmentize -g'
Results #
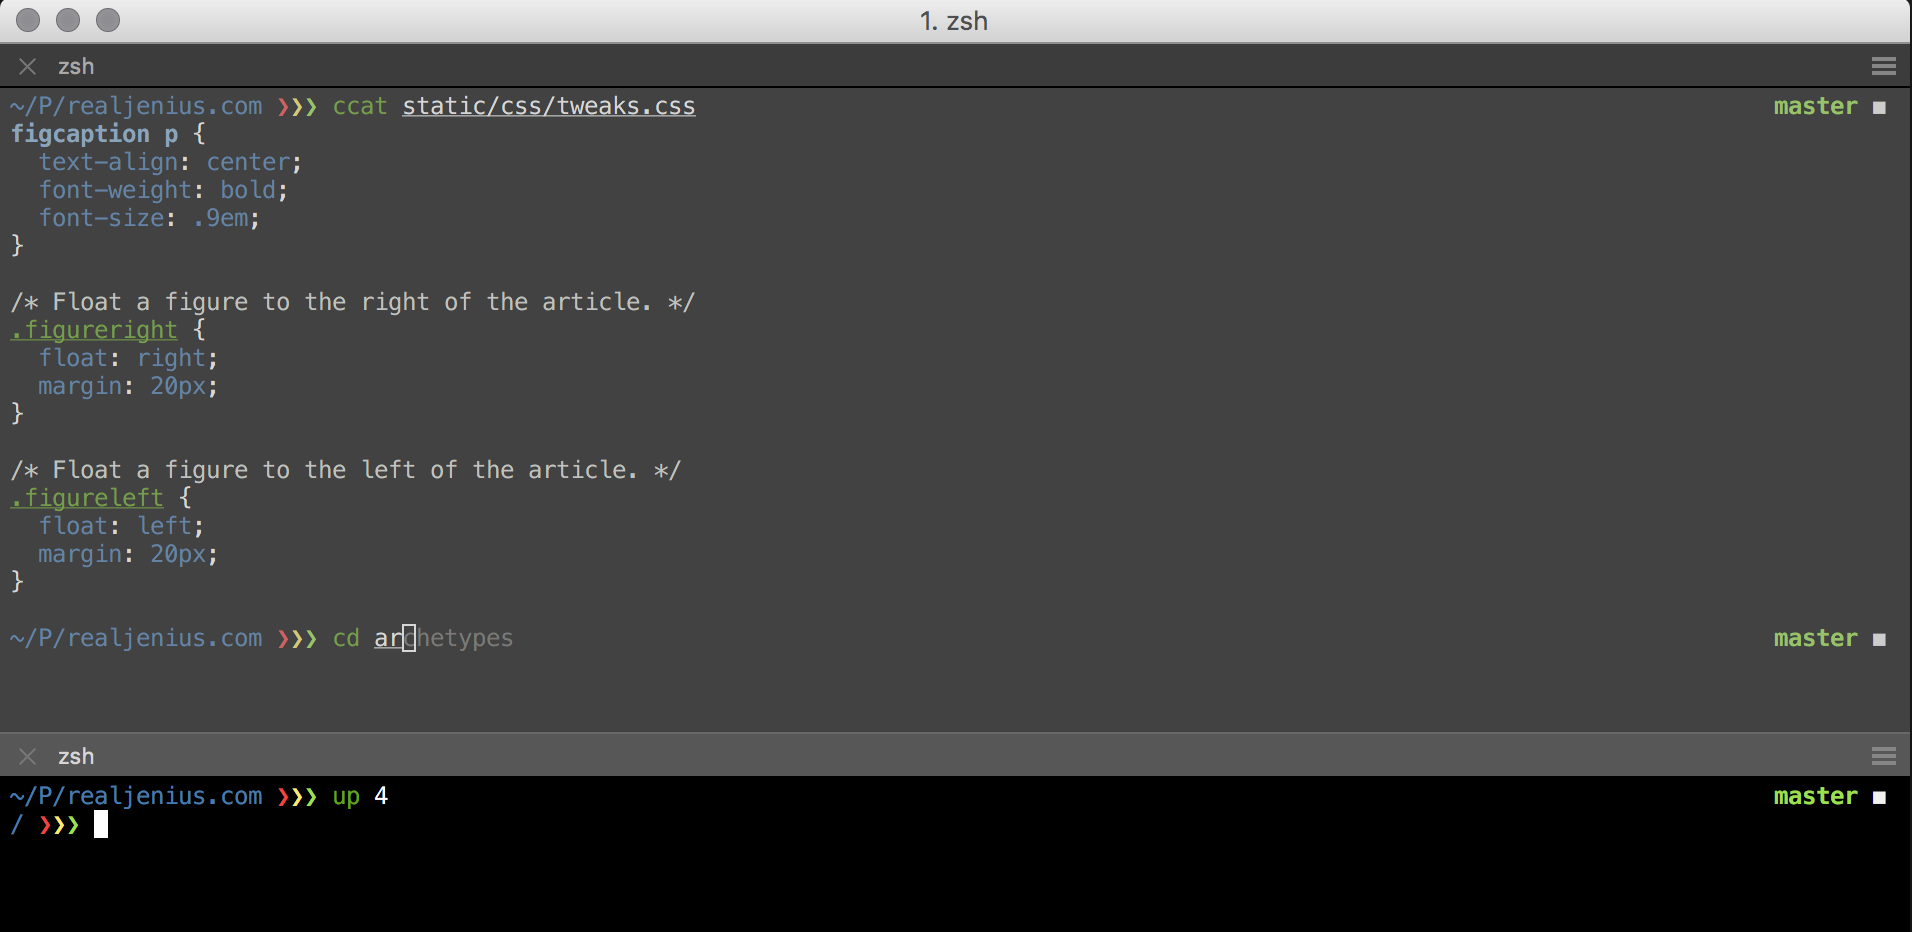
Here’s a screenshot of my terminal with all of these customizations applied:
